Ceph Cluster installation
Document created on 2013-09-17
Nicolas Bondier
* * *

Copyright © 2013 by Switzernet
Contents
Add a second monitor and OSD server
Add a third monitor and OSD server
Mount the block device on the client
Compile kernel with RBD drivers
Introduction
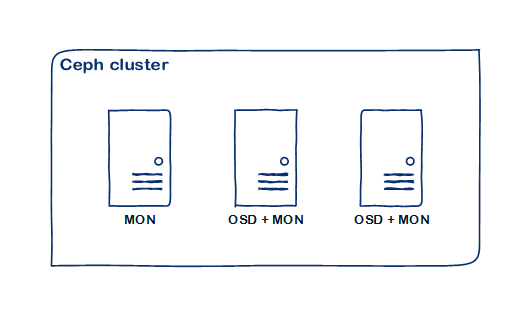
This document describes the installation of a three nodes Ceph cluster with one Rados Block device client.
Prerequisites
Servers
For this document, we will use three hosted servers. Our hosting provider is ovh.com.
The cluster will be composed of three servers with OSD daemons and monitors.
According to the Ceph [documentation]:
- OSDs: “A Ceph OSD Daemon (OSD) stores data, handles data replication, recovery, backfilling, rebalancing, and provides some monitoring information to Ceph Monitors by checking other Ceph OSD Daemons for a heartbeat. A Ceph Storage Cluster requires at least two Ceph OSD Daemons to achieve an active + clean state.”
- Monitors: “A Ceph Monitor maintains maps of the cluster state, including the monitor map, the OSD map, the Placement Group (PG) map, and the CRUSH map. Ceph maintains a history (called an “epoch”) of each state change in the Ceph Monitors, Ceph OSD Daemons, and PGs.”
One of these servers will also be used as admin server for executing the ceph-deploy command line tool.
Cluster creation
Server installation
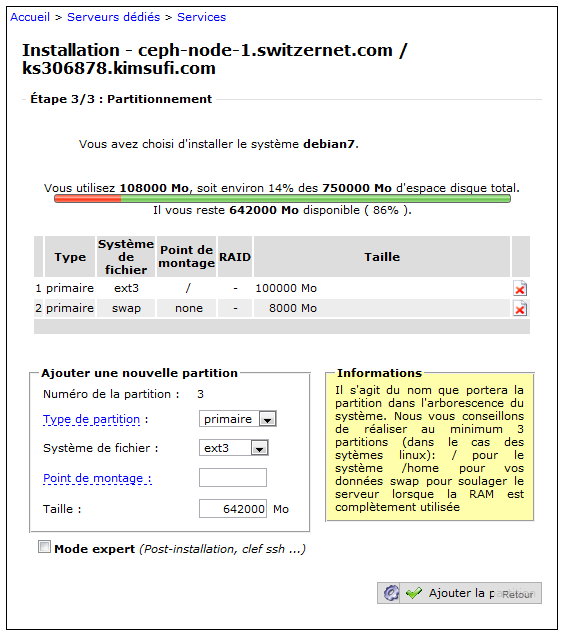
For this document, we use the current Debian stable release, Debian 7.
Partition nodes disks in order to have a free partition with a lot of space. This will be the storage place that your OSD daemons will use.
Here, we allocate ≈ 100Go for the system and the rest for the storage partition. Do not forget to reserve same space for the swap file system. We will format the empty space later.
Network configuration
Once we have formatted all our nodes, we must configure hostnames to permit Ceph to work properly.
Our network configuration is the following:
94.23.225.212 ceph-node-1.switzernet.com
91.121.140.57 ceph-node-2.switzernet.com
91.121.152.50 ceph-node-3.switzernet.com
Edit /etc/hosts on all nodes following the above example:
root@ks358237:~# cat /etc/hosts
# Do not remove the following line, or various programs
# that require network functionality will fail.
127.0.0.1 localhost.localdomain localhost
# The following lines are desirable for IPv6 capable hosts
#(added automatically by netbase upgrade)
::1 ip6-localhost ip6-loopback
fe00::0 ip6-localnet
ff00::0 ip6-mcastprefix
ff02::1 ip6-allnodes
ff02::2 ip6-allrouters
ff02::3 ip6-allhosts
# Ceph cluster
94.23.225.212 ceph-node-1.switzernet.com
ceph-node-1
91.121.140.57 ceph-node-2.switzernet.com ceph-node-2
91.121.152.50 ceph-node-3.switzernet.com ceph-node-3
root@ks358237:~#
For each server, edit the /etc/hostname file and replace with its new name.
root@ks358237:~# echo ceph-node-3.switzernet.com
> /etc/hostname
root@ks358237:~#
Apply the modifications, close your SSH session and reconnect to see your new modifications
root@ks358237:~#
/etc/init.d/hostname.sh
root@ks358237:~# exit
...
(ssh reconnection)
...
root@ceph-node-3:~# hostname
ceph-node-3.switzernet.com
root@ceph-node-3:~#
Optionally, before going further verify that all your network configuration is correct by restarting the network on your servers:
root@ceph-node-3:~# /etc/init.d/networking restart
Test the ping on each server:
root@ceph-node-1:~# for i in 1 2 3; do ping -q -c 1
ceph-node-$i.switzernet.com > /dev/null && echo "ping:
ceph-node-$i.switzernet.com OK"; done
ping: ceph-node-1.switzernet.com OK
ping: ceph-node-2.switzernet.com OK
ping: ceph-node-3.switzernet.com OK
root@ceph-node-1:~#
NTP time synchronization
In order to prevent clock skew between the cluster nodes, synchronize your servers with NTP server:
root@ceph-node-1:~# aptitude install ntp
root@ceph-node-1:~# /etc/init.d/ntp restart
Empty partition formatting
We will now format the last partition in order to create an empty file system on it. Run fdisk on your disk device:
root@ceph-node-2:~# fdisk /dev/sda
Print the table:
Command (m for help): p
Disk /dev/sda: 1000.2 GB, 1000204886016 bytes
255 heads, 63 sectors/track, 121601 cylinders, total 1953525168 sectors
Units = sectors of 1 * 512 = 512 bytes
Sector size (logical/physical): 512 bytes / 512 bytes
I/O size (minimum/optimal): 512 bytes / 512 bytes
Disk identifier: 0x000eead4
Device Boot Start End Blocks Id System
/dev/sda1 * 4096 204802047 102398976 83 Linux
/dev/sda2 204802048 221183999
8190976 82 Linux swap /
Solaris
Add a new partition. It must begin at the last sector + 1 of the last partition:
Command (m for help): n
Partition type:
p primary (2 primary, 0 extended, 2 free)
e extended
Select (default p): p
Partition number (1-4, default 3):
Using default value 3
First sector (2048-1953525167, default 2048): 221184000
Last sector, +sectors or +size{K,M,G} (221184000-1953525167, default
1953525167):
Using default value 1953525167
Command (m for help): p
Disk /dev/sda: 1000.2 GB, 1000204886016 bytes
255 heads, 63 sectors/track, 121601 cylinders, total 1953525168 sectors
Units = sectors of 1 * 512 = 512 bytes
Sector size (logical/physical): 512 bytes / 512 bytes
I/O size (minimum/optimal): 512 bytes / 512 bytes
Disk identifier: 0x000eead4
Device Boot Start End Blocks Id System
/dev/sda1 * 4096 204802047 102398976 83 Linux
/dev/sda2 204802048 221183999 8190976 82 Linux swap /
Solaris
/dev/sda3 221184000 1953525167
866170584 83 Linux
In our example, fdisk created a Linux partion by default (ID 83). If this is not the case, add the partition type manually:
Command (m for help): t
Partition number (1-4): 3
Hex code (type L to list codes): 83
Command (m for help): p
Disk /dev/sda: 1000.2 GB, 1000204886016 bytes
255 heads, 63 sectors/track, 121601 cylinders, total 1953525168 sectors
Units = sectors of 1 * 512 = 512 bytes
Sector size (logical/physical): 512 bytes / 512 bytes
I/O size (minimum/optimal): 512 bytes / 512 bytes
Disk identifier: 0x000eead4
Device Boot Start End Blocks Id System
/dev/sda1 * 4096 204802047 102398976 83 Linux
/dev/sda2 204802048 221183999 8190976 82 Linux swap /
Solaris
/dev/sda3 221184000 1953525167 866170584 83 Linux
And finally write the changes to the disk and reboot
Command (m for help): w
The partition table has been altered!
Calling ioctl() to re-read partition table.
WARNING: Re-reading the partition table failed with error 16: Device or
resource busy.
The kernel still uses the old table. The new table will be used at
the next reboot or after you run partprobe(8) or kpartx(8)
Syncing disks.
root@ceph-node-2:~# reboot
Ceph preflight checklist
The following steps must be executed on all servers.
Install sudo package if it is not installed.
root@ceph-node-1:~# aptitude update
[...]
Fetched 329 kB in 0s (345 kB/s)
root@ceph-node-2:~# aptitude search sudo
p
dpsyco-sudo
- Automate administration of sudo privileges
v gnome-sudo
-
p
gnome-sudoku
- Sudoku puzzle game for GNOME
p gosa-plugin-sudo
- sudo plugin for GOsa▒
p
gosa-plugin-sudo-schema
- LDAP schema for GOsa▒
sudo plugin
p kdesudo
- sudo frontend for KDE
p
ksudoku
- Sudoku puzzle game and solver
p libsss-sudo-dev
- Communicator library for sudo -- development files
p
libsss-sudo0
- Communicator library for sudo
p sudo
- Provide limited super user privileges to specific users
p sudo-ldap
- Provide limited super user privileges to specific users
p
sudoku
- console based sudoku
p vdr-plugin-sudoku
- VDR-Plugin to generate and solve Sudokus
root@ceph-node-1:~#
root@ceph-node-1:~# aptitude install sudo
Install lsb on your system. This can take a while:
root@ceph-node-1:~# aptitude install lsb –y
The following NEW packages will be installed:
[...]
0 packages upgraded, 344 newly installed, 0 to remove and 0 not upgraded.
Need to get 192 MB of archives. After unpacking 589 MB will be used.
[...]
Add your new ceph user:
root@ceph-node-1:~# sudo useradd -d /home/ceph -m ceph
root@ceph-node-1:~# sudo passwd ceph
Enter new UNIX password:
Retype new UNIX password:
passwd: password updated successfully
root@ceph-node-1:~#
Provide full privileges to this user using sudo do:
root@ceph-node-1:~# echo "ceph ALL = (root)
NOPASSWD:ALL" | sudo tee /etc/sudoers.d/ceph
ceph ALL = (root) NOPASSWD:ALL
root@ceph-node-1:~# sudo chmod 0440 /etc/sudoers.d/ceph
Configure your servers with password-less SSH access to each node running Ceph daemons (leave the passphrase empty).
ssh-keygen
Generating public/private key pair.
Enter file in which to save the key (/ceph-client/.ssh/id_rsa):
Enter passphrase (empty for no passphrase):
Enter same passphrase again:
Your identification has been saved in /ceph-client/.ssh/id_rsa.
Your public key has been saved in /ceph-client/.ssh/id_rsa.pub.
Copy the key to each other nodes:
root@ceph-node-1:~# ssh-copy-id ceph@ceph-node-2.switzernet.com
root@ceph-node-1:~# ssh-copy-id ceph@ceph-node-3.switzernet.com
Modify the ~/.ssh/config for adding an automatic SSH connection with ceph user. Here, we added the following lines on all servers:
Host ceph-node-1
User ceph
Host ceph-node-2
User ceph
Host ceph-node-3
User ceph
Install ceph repository on your first server:
root@ceph-node-1:~# wget -q -O-
'http://ceph.com/git/?p=ceph.git;a=blob_plain;f=keys/release.asc' | sudo
apt-key add -
OK
root@ceph-node-1:~# echo deb http://ceph.com/debian-dumpling/$(lsb_release
-sc) main | sudo tee /etc/apt/sources.list.d/ceph.list
deb http://ceph.com/debian-dumpling/ wheezy main
root@ceph-node-1:~# sudo apt-get update
[...]
Get:6 http://ceph.com wheezy Release.gpg [836
B]
Get:7 http://ceph.com wheezy Release [5,990 B]
Get:8 http://ceph.com wheezy/main amd64
Packages [7,155 B]
[...]
root@ceph-node-1:~#
First monitor installation
Install ceph-deploy on our first server
root@ceph-node-1:~# apt-get install ceph-deploy
Create and go to our working directory:
root@ceph-node-1:~# mkdir cluster
root@ceph-node-1:~# cd cluster
Declare your first node:
root@ceph-node-1:~/cluster# ceph-deploy new ceph-node-1
Deploy ceph on this server:
root@ceph-node-1:~/cluster# ceph-deploy install ceph-node-1
Create the first monitor:
root@ceph-node-1:~/cluster# ceph-deploy mon create ceph-node-1
After these steps, you should see some files in your current directory:
root@ceph-node-1:~/cluster# ls
ceph.conf ceph.log ceph.mon.keyring
The ceph.conf file contains the first configuration of your cluster.
root@ceph-node-1:~/cluster# cat ceph.conf
[global]
fsid = 10c95f01-2dd2-4863-affa-60c4eafcd8d2
mon initial members = ceph-node-1
mon host = 94.23.225.212
auth supported = cephx
osd journal size = 1024
filestore xattr use omap = true
The next step is to gather the keys. These keys will be used by all the nodes of the cluster for authenticate all the services.
root@ceph-node-1:~/cluster# ceph-deploy gatherkeys
ceph-node-1
root@ceph-node-1:~/cluster# ls
ceph.bootstrap-mds.keyring ceph.bootstrap-osd.keyring ceph.client.admin.keyring
ceph.conf ceph.log ceph.mon.keyring
Modify your ceph.conf file, under /etc/ceph/ceph.conf in order to update it with our last configuration:
[global]
fsid = 10c95f01-2dd2-4863-affa-60c4eafcd8d2
mon_initial_members = ceph-node-1
mon_host = 94.23.225.212
auth cluster required = cephx
auth service required = cephx
auth client required = cephx
osd_journal_size = 1024
filestore_xattr_use_omap = true
[mon.ceph-node-1]
host = ceph-node-1
mon addr = 94.23.225.212:6789
You can now restart the ceph service on your server and check that your monitor is restarting well.
root@ceph-node-1:~/cluster# service ceph restart
Install the first OSD
List the partition on the server disk in order to find the storage partition on your server:
root@ceph-node-1:~/cluster# ceph-deploy disk list ceph-node-1
[ceph-node-1][INFO ] Running command: ceph-disk list
[ceph-node-1][INFO ] /dev/sda :
[ceph-node-1][INFO ] /dev/sda1 other, ext3, mounted on /
[ceph-node-1][INFO ] /dev/sda2 swap, swap
[ceph-node-1][INFO ] /dev/sda3 other, xfs
“Zap” the disk:
root@ceph-node-1:~/cluster# ceph-deploy disk zap ceph-node-1:sda3
Prepare it:
root@ceph-node-1:~/cluster# ceph-deploy osd prepare ceph-node-1:sda3
And finally activate it:
root@ceph-node-1:~/cluster# ceph-deploy osd activate ceph-node-1:sda3
Update the /etc/ceph/ceph.conf file:
[global]
fsid = 10c95f01-2dd2-4863-affa-60c4eafcd8d2
mon_initial_members = ceph-node-1
mon_host = 94.23.225.212
auth cluster required = cephx
auth service required = cephx
auth client required = cephx
osd_journal_size = 1024
filestore_xattr_use_omap = true
[mon.ceph-node-1]
host = ceph-node-1
mon addr = 94.23.225.212:6789
[osd.0]
host = ceph-node-1
addr = 94.23.225.212
Verify that all service restart correctly:
root@ceph-node-1:~/cluster# service ceph restart
=== mon.ceph-node-1 ===
=== mon.ceph-node-1 ===
Stopping Ceph mon.ceph-node-1 on ceph-node-1...kill 8514...done
=== mon.ceph-node-1 ===
Starting Ceph mon.ceph-node-1 on ceph-node-1...
Starting ceph-create-keys on ceph-node-1...
=== osd.0 ===
=== osd.0 ===
Stopping Ceph osd.0 on ceph-node-1...kill 9305...kill 9305...done
=== osd.0 ===
create-or-move updated item name 'osd.0' weight 0.58 at location
{host=ceph-node-1,root=default} to crush map
Starting Ceph osd.0 on ceph-node-1...
starting osd.0 at :/0 osd_data /var/lib/ceph/osd/ceph-0
/var/lib/ceph/osd/ceph-0/journal
root@ceph-node-1:~#
Ceph status is showing that both OSD and Monitor are up:
root@ceph-node-1:~# ceph status
cluster 10c95f01-2dd2-4863-affa-60c4eafcd8d2
health HEALTH_OK
monmap e1: 1 mons at {ceph-node-1=94.23.225.212:6789/0}, election epoch
1, quorum 0 ceph-node-1
osdmap e23: 1 osds: 1 up, 1 in
pgmap v34: 192 pgs: 128 active+degraded, 64 active+replay+degraded; 0
bytes data, 1058 MB used, 591 GB / 592 GB avail
mdsmap e1: 0/0/1 up
root@ceph-node-1:~#
Add a second monitor and OSD server
Install and create monitor on the second node:
root@ceph-node-1:~# ceph-deploy install ceph-node-2
[...]
root@ceph-node-1:~# ceph-deploy mon create ceph-node-2
Update /etc/ceph/ceph.conf on all your nodes with the new monitor:
[global]
fsid = 10c95f01-2dd2-4863-affa-60c4eafcd8d2
mon_initial_members = ceph-node-1
mon_host = 94.23.225.212
auth cluster required = cephx
auth service required = cephx
auth client required = cephx
osd_journal_size = 1024
filestore_xattr_use_omap = true
[mon.ceph-node-1]
host = ceph-node-1
mon addr = 94.23.225.212:6789
[mon.ceph-node-2]
host = ceph-node-2
mon addr = 91.121.140.57:6789
[osd.0]
host = ceph-node-1
addr = 94.23.225.212
On your second node, restart ceph and verify the status of your ceph cluster:
root@ceph-node-2:/etc/ceph# ceph
status
cluster c964d663-6199-4b8e-831a-215cadd117c3
health HEALTH_WARN 192 pgs degraded; 192 pgs stuck unclean; clock skew
detected on mon.ceph-node-1
monmap e2: 2 mons at {ceph-node-1=94.23.225.212:6789/0,ceph-node
2=91.121.140.57:6789/0}, election epoch 2, quorum 0,1 ceph-node-1,ceph
node-2
osdmap e16: 1 osds: 1 up, 1 in
pgmap v25: 192 pgs: 192 active+degraded; 0 bytes data, 1058 MB used,
824 GB / 825 GB avail
mdsmap e1: 0/0/1 up
We will now add a second OSD on our second node. List all available disks using ceph-deploy:
root@ceph-node-1:~/cluster# ceph-deploy disk list ceph-node-2
[ceph_deploy.sudo_pushy][DEBUG ] will use a remote connection with sudo
[ceph_deploy.osd][INFO ] Distro info: Debian 7 wheezy
[ceph_deploy.osd][DEBUG ] Listing disks on ceph-node-2...
[ceph-node-2][INFO ] Running command: ceph-disk list
[ceph-node-2][INFO ] /dev/sda :
[ceph-node-2][INFO ] /dev/sda1 other, ext3, mounted on /
[ceph-node-2][INFO ] /dev/sda2 swap, swap
[ceph-node-2][INFO ] /dev/sda3 other,
xfs, mounted on /var/lib/ceph/osd/ceph-0
Prepare and activate the OSD daemon on this server:
root@ceph-node-1:~/cluster# ceph-deploy
osd prepare ceph-node-2:sda3
[ceph_deploy.osd][DEBUG ] Preparing
cluster ceph disks ceph-node
2:/dev/sda3:
[ceph_deploy.sudo_pushy][DEBUG ] will
use a remote connection with sudo
[ceph_deploy.osd][INFO ] Distro info:
Debian 7 wheezy
[ceph_deploy.osd][DEBUG ] Deploying
osd to ceph-node-2
[ceph-node-2][INFO ] write cluster
configuration to
/etc/ceph/{cluster}.conf
[ceph-node-2][ERROR ] Traceback (most
recent call last):
[ceph-node-2][ERROR ] File
"/usr/lib/python2.7/dist
packages/ceph_deploy/util/decorators.py", line 10, in inner
[ceph-node-2][ERROR ] File
"/usr/lib/python2.7/dist
packages/ceph_deploy/conf.py", line 12, in write_conf
[ceph-node-2][ERROR ] RuntimeError:
config file /etc/ceph/ceph.conf exists
with different content; use --overwrite-conf to overwrite
[ceph-node-2][INFO ] Running command:
udevadm trigger --subsystem
match=block --action=add
[ceph_deploy.osd][DEBUG ] Preparing
host ceph-node-2 disk /dev/sda3 journal
None activate False
[ceph-node-2][INFO ] Running command:
ceph-disk-prepare --cluster ceph --
/dev/sda3
[ceph-node-2][INFO ]
meta-data=/dev/sda3 isize=2048
agcount=4, agsize=54135662 blks
[ceph-node-2][INFO ]
= sectsz=512 attr=2,
projid32bit=0
[ceph-node-2][INFO ] data
= bsize=4096
blocks=216542646, imaxpct=25
[ceph-node-2][INFO ]
= sunit=0
swidth=0 blks
[ceph-node-2][INFO ] naming =version
2 bsize=4096 ascii
ci=0
[ceph-node-2][INFO ] log
=internal log bsize=4096
blocks=105733, version=2
[ceph-node-2][INFO ]
= sectsz=512 sunit=0
blks, lazy-count=1
[ceph-node-2][INFO ] realtime
=none extsz=4096
blocks=0, rtextents=0
[ceph_deploy.osd][DEBUG ] Host
ceph-node-2 is now ready for osd use.
root@ceph-node-1:~/cluster# ceph-deploy osd
activate ceph-node-2:sda3
[ceph_deploy.osd][DEBUG ] Activating
cluster ceph disks ceph-node
2:/dev/sda3:
[ceph_deploy.sudo_pushy][DEBUG ] will
use a remote connection with sudo
[ceph_deploy.osd][DEBUG ] Activating host
ceph-node-2 disk /dev/sda3
[ceph_deploy.osd][DEBUG ] Distro Debian
codename wheezy, will use sysvinit
Once the installation is done, update the /etc/ceph/ceph.conf configuration file on all servers and test it by restarting the ceph services on your new node:
[global]
fsid = 10c95f01-2dd2-4863-affa-60c4eafcd8d2
mon_initial_members = ceph-node-1
mon_host = 94.23.225.212
auth cluster required = cephx
auth service required = cephx
auth client required = cephx
osd_journal_size = 1024
filestore_xattr_use_omap = true
[mon.ceph-node-1]
host = ceph-node-1
mon addr = 94.23.225.212:6789
[mon.ceph-node-2]
host = ceph-node-2
mon addr = 91.121.140.57:6789
[osd.0]
host = ceph-node-1
addr = 94.23.225.212
[osd.1]
host = ceph-node-2
addr = 91.121.140.57
root@ceph-node-2:~# service ceph restart
=== mon.ceph-node-2 ===
=== mon.ceph-node-2 ===
Stopping Ceph mon.ceph-node-2 on ceph-node-2...kill 19347...done
=== mon.ceph-node-2 ===
Starting Ceph mon.ceph-node-2 on ceph-node-2...
Starting ceph-create-keys on ceph-node-2...
=== osd.1 ===
=== osd.1 ===
Stopping Ceph osd.1 on ceph-node-2...kill 19865...done
=== osd.1 ===
create-or-move updated item name 'osd.1' weight 0.81 at location
{host=ceph-node-2,root=default} to crush map
Starting Ceph osd.1 on ceph-node-2...
starting osd.1 at :/0 osd_data /var/lib/ceph/osd/ceph-1
/var/lib/ceph/osd/ceph-1/journal
=== mon.ceph-node-2 ===
=== mon.ceph-node-2 ===
Stopping Ceph mon.ceph-node-2 on ceph-node-2...kill 24652...done
=== mon.ceph-node-2 ===
Starting Ceph mon.ceph-node-2 on ceph-node-2...
Starting ceph-create-keys on ceph-node-2...
=== osd.1 ===
=== osd.1 ===
Stopping Ceph osd.1 on ceph-node-2...kill 24973...kill 24973...done
=== osd.1 ===
create-or-move updated item name 'osd.1' weight 0.81 at location
{host=ceph-node-2,root=default} to crush map
Starting Ceph osd.1 on ceph-node-2...
starting osd.1 at :/0 osd_data /var/lib/ceph/osd/ceph-1
/var/lib/ceph/osd/ceph-1/journal
Add a third monitor and OSD server
Repeat the instructions of the above chapter with your new server name/id.
Create the shared file system
Create a block device image
We are going to create a block device image that will be mounted as a disk storage by our cluster clients.
The block device will be stored inside a pool on which we will be able to set some settings like the number of copies for each placement group (See chapter http://ceph.com/docs/master/rados/operations/placement-groups/ for more info).
On a fresh ceph installation, 3 pools are set in the storage cluster. You can view them all with the command ‘ceph osd lspools’. The output is ‘id name, id name, …’.
root@ceph-node-2:~# ceph osd lspools
0 data,1 metadata,2
rbd,
Create a new pool:
root@ceph-node-2:~# ceph osd pool create switzernet 64
pool 'switzernet_data' created
You can view your new created pool with its id:
root@ceph-node-2:~# ceph osd lspools
0 data,1 metadata,2 rbd,3 switzernet,
By default, each pool stores placement groups in two different OSD servers. This parameter can be increased. Here we will set this setting to three for a better security.
root@ceph-node-2:~# ceph osd pool set switzernet size 3
set pool 3 min_size to 3
root@ceph-node-2:~#
Note: There is also a second parameter called ‘min_size’. This parameter is the minimum number of copy available required to be able to make read/write operations. Here we keep the value to 1.
You can view the Placement Group distribution along the cluster with the following command:
root@ceph-node-2:~# ceph pg dump
dumped all in format plain
version 275
stamp 2013-09-23 16:36:59.668352
last_osdmap_epoch 121
last_pg_scan 113
full_ratio 0.95
nearfull_ratio 0.85
pg_stat objects mip degr unf bytes log [...] up acting
[...]
3.f 0 0 0 0 0 0 [...] [1,2,0]
[1,2,0] [...]
0.c 0 0 0 0 0 0 [...] [0,2] [0,2]
[...]
1.d 0 0 0 0 0 0 [...] [1,0] [1,0]
[...]
[...]
The first column id is the placement group id. It is composed of the pool id and a unique id in this pool for the placement group.
‘Up’ and ‘acting’ columns represent the OSD IDs where are stored the placement group.
For viewing the placement groups for the ‘switzernet’ pool, just grep the lines beginning with the corresponding group id. In the following example, you can see that placement groups for the ‘switzernet’ pool are on the OSD servers with ID 0, 1 and 2:
root@ceph-node-2:~# ceph pg dump | grep "^3"
dumped all in format plain
3.f 0 0 0 0 0 0 0
active+clean 2013-09-23 16:30:56.356438 0'0 121:26 [1,2,0]
[1,2,0] 0'0 2013-09-23
15:54:54.507846 0'0 2013-09-23
15:54:54.507846
3.8 0 0 0 0 0 0 0
active+clean 2013-09-23 16:30:56.435801 0'0 121:26 [1,2,0]
[1,2,0] 0'0 2013-09-23 15:54:54.507255 0'0 2013-09-23
15:54:54.507255
3.9 0 0 0 0 0 0 0
active+clean 2013-09-23 16:30:59.269540 0'0 121:26 [0,2,1]
[0,2,1] 0'0 2013-09-23 15:54:54.520746 0'0 2013-09-23
15:54:54.520746
3.a 0 0 0 0 0 0 0
active+clean 2013-09-23 16:30:59.290387 0'0 121:26 [0,1,2]
[0,1,2] 0'0 2013-09-23 15:54:54.522486 0'0 2013-09-23
15:54:54.522486
3.b 0 0 0 0 0 0 0
active+clean 2013-09-23 16:30:56.752459 0'0 121:26 [1,0,2]
[1,0,2] 0'0 2013-09-23 15:54:54.507450 0'0 2013-09-23
15:54:54.507450
3.4 0 0 0 0 0 0 0
active+clean 2013-09-23 16:30:59.295668 0'0 121:26 [0,1,2]
[0,1,2] 0'0 2013-09-23 15:54:54.514887 0'0 2013-09-23
15:54:54.514887
3.5 0 0 0 0 0 0 0
active+clean 2013-09-23 16:30:59.274965 0'0 121:26 [0,1,2]
[0,1,2] 0'0 2013-09-23 15:54:54.516553 0'0 2013-09-23
15:54:54.516553
3.6 0 0 0 0 0 0 0
active+clean 2013-09-23 16:31:00.950962 0'0 121:26 [2,0,1]
[2,0,1] 0'0 2013-09-23 15:54:54.476742 0'0 2013-09-23
15:54:54.476742
3.7 0 0 0 0 0 0 0
active+clean 2013-09-23 16:30:59.278790 0'0 121:26 [0,1,2]
[0,1,2] 0'0 2013-09-23 15:54:54.518835 0'0 2013-09-23
15:54:54.518835
3.0 0 0 0 0 0 0 0
active+clean 2013-09-23 16:30:56.752025 0'0 121:26 [1,0,2]
[1,0,2] 0'0 2013-09-23 15:54:54.506757 0'0 2013-09-23
15:54:54.506757
3.1 0 0 0 0 0 0 0
active+clean 2013-09-23 16:30:59.292265 0'0 121:26 [0,2,1]
[0,2,1] 0'0 2013-09-23 15:54:54.507287 0'0 2013-09-23
15:54:54.507287
Mount the block device on the client
Important: At this point, you can continue the following document or directly go to the next document for creating a cluster file system on top of rbd: [http://switzernet.com/3/public/130910-ceph-dovecot/].
Install required packages:
root@client1:# aptitude install lsb
Install ceph-common:
root@client1:# wget -q -O- 'http://ceph.com/git/?p=ceph.git;a=blob_plain;f=keys/release.asc' | apt-key add –
root@client1:# echo deb http://ceph.com/debian-dumpling/ $(lsb_release -sc) main | tee /etc/apt/sources.list.d/ceph.list
root@client1:# aptitude update
root@client1:# apt-get install ceph-common
Create the /etc/ceph directory and download your cluster ceph.conf and client key in this folder.
root@client1:# mkdir /etc/ceph
root@client1:# scp root@ceph-node-2.switzernet.com:/etc/ceph/ceph.conf
/etc/ceph
root@client1:# scp
root@ceph-node-2.switzernet.com:/etc/ceph/ceph.client.admin.keyring /etc/ceph
Note: You can create other clients keys with less privileges than the client admin key we are using in this example. See the doc http://ceph.com/docs/master/rados/operations/authentication/
Install the block device drivers in your kernel if your client does not have them installed with the how-to of this document [Compile kernel with RBD drivers].
Inside our pool, create a new Block device image. Here we create a 100GB one.
root@client1:# rbd create data_01 --size 102400 --pool switzernet
You can list and view information about your block devices images with the following commands:
root@client1:# rbd ls switzernet
data_01
root@client1:# rbd --image data_01 -p switzernet info
rbd image 'data_01':
size 102400 MB in 25600 objects
order 22 (4096 KB objects)
block_name_prefix: rb.0.1a67.2ae8944a
format: 1
root@client1:#
And now, map the block device image:
root@client1:# rbd map data_01 --pool switzernet
You can view mapped image with the following command:
root@client1:# rbd showmapped
id pool image snap device
1 switzernet data_01 - /dev/rbd1
Create a file system on the block device:
root@client1:# mkfs.ext4 -m0 /dev/rbd/switzernet/data_01
And finally mount the block device to your system with
root@client1:# mkdir /mnt/switzernet_data_01
root@client1:# mount /dev/rbd/switzernet/data_01 /mnt/switzernet_data_01
Annexes
Compile kernel with RBD drivers
In order to mount a Rados block device, you need to have the RBD drivers installed.
This is the how-to of the installation in the kernel for an OVH.com hosted machine.
Install some packages required for the compilation/configuration:
root@ceph-node-2:/usr/src/linux-3.9.10# apt-get
update
root@ceph-node-2:/usr/src/linux-3.9.10# apt-get install gcc make ncurses-dev
[...]
Go to /usr/src
root@ceph-node-2:~# cd /usr/src
Get your kernel version:
root@ceph-node-2:/usr/src# uname –r
3.10.9-xxxx-grs-ipv6-64
root@ceph-node-2:/usr/src# uname -r | perl -ne 's/(.*[0-9]+\.[0-9]+\.[0-
9]+).*/$1/g; print'
3.10.9
Find it on www.kernerl.org website. Download it:
root@ceph-node-2:/usr/src# wget
https://www.kernel.org/pub/linux/kernel/v3.x/linux-3.9.10.tar.bz2
--2013-09-24 11:02:54--
https://www.kernel.org/pub/linux/kernel/v3.x/linux-3.9.10.tar.bz2
Resolving www.kernel.org (www.kernel.org)... 149.20.4.69, 198.145.20.140
Connecting to www.kernel.org (www.kernel.org)|149.20.4.69|:443...
connected.
HTTP request sent, awaiting response... 200 OK
Length: 86076186 (82M) [application/x-bzip2]
Saving to: `linux-3.9.10.tar.bz2'
100%[=========================================================>] 86,076,186
6.71M/s in 15s
2013-09-24 11:03:11 (5.65 MB/s) - `linux-3.9.10.tar.bz2' saved
[86076186/86076186]
root@ceph-node-2:/usr/src#
Decompress it:
root@ceph-node-2:/usr/src# tar xf linux-3.9.10.tar.bz2
Go to the new folder
root@ceph-node-2:/usr/src# cd linux-3.9.10
Get the config file used for compiling your kernel. For our server hosted at ovh.com, the config file is available on their ftp:
root@ceph-node-2:/usr/src/linux-3.9.10# wget ftp://ftp.ovh.net/made-in-ovh/bzImage/3.10.9/config-3.10.9-xxxx-grs-ipv6-64 .
Copy this file to the .config file.
root@ceph-node-2:/usr/src/linux-3.9.10# cp config-3.10.9-xxxx-grs-ipv6-64 .config
Type make proper:
root@ceph-node-2:/usr/src/linux-3.9.10# make proper
[...] (press enter if questions)
root@ceph-node-2:/usr/src/linux-3.9.10#
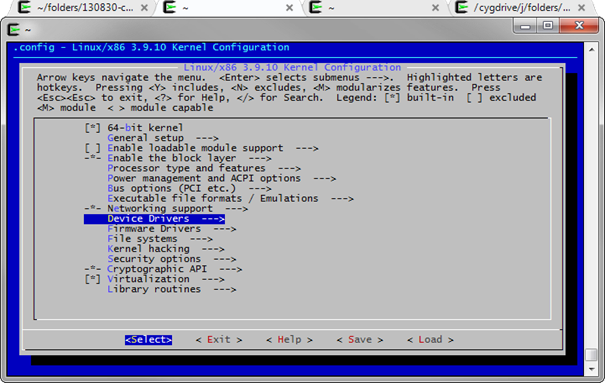
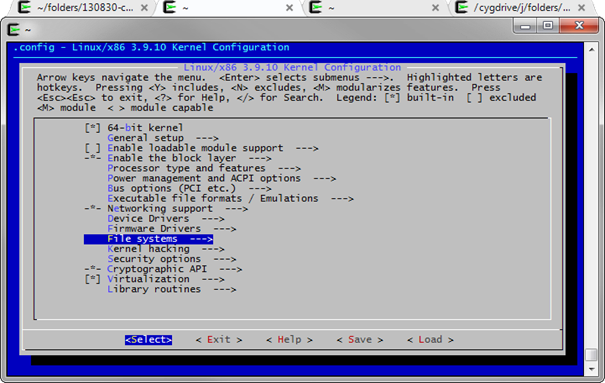
Launch the graphical configuration interface:
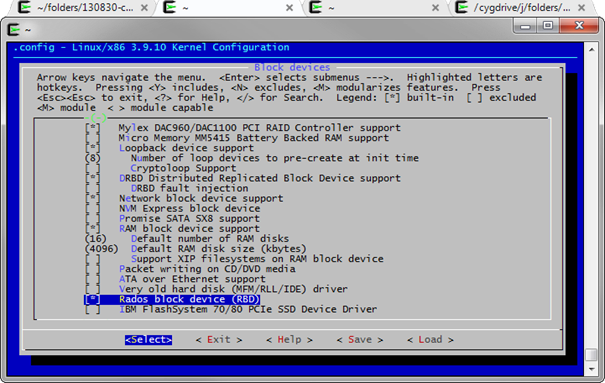
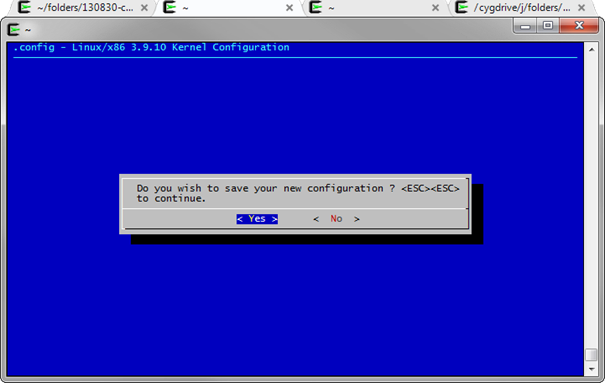
root@ceph-node-2:/usr/src/linux-3.9.10# make menuconfig
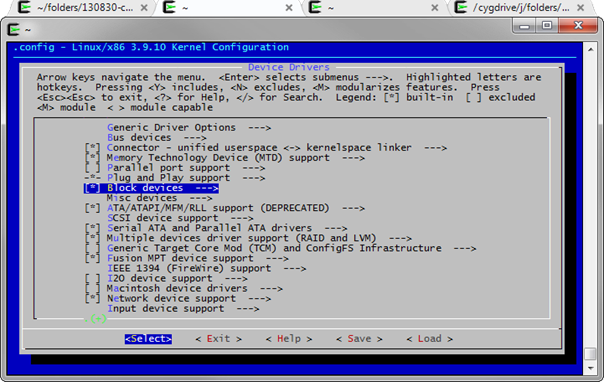
Go to “Device Drivers”, “Block Devices” and select “Rados block device (RBD)” as a build-in driver:
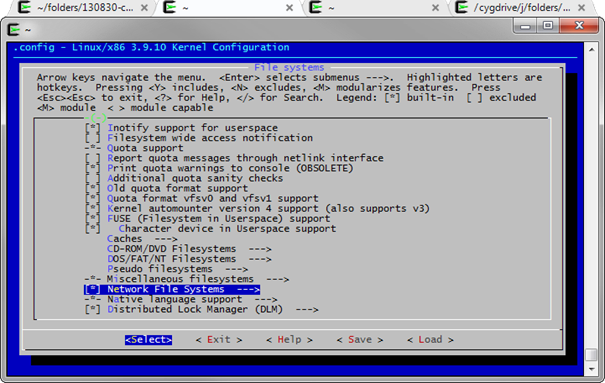
You may also want to test the Ceph file system.
Go to “File systems”, “Network File Systems” and select “Ceph distributed file system” as built-in module.
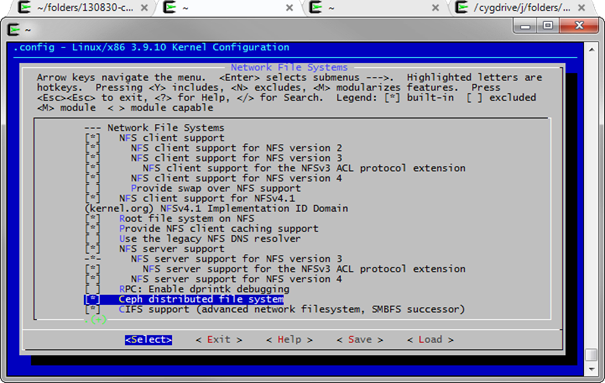
Then save and exit.
And finally, build the kernel:
root@ceph-node-2:/usr/src/linux-3.9.10# make
scripts/kconfig/conf --silentoldconfig Kconfig
SYSHDR arch/x86/syscalls/../include/generated/uapi/asm/unistd_32.h
SYSHDR arch/x86/syscalls/../include/generated/uapi/asm/unistd_64.h
[...]
OBJCOPY arch/x86/boot/setup.bin
OBJCOPY arch/x86/boot/vmlinux.bin
HOSTCC arch/x86/boot/tools/build
BUILD arch/x86/boot/bzImage
Setup is 15484 bytes (padded to 15872 bytes).
System is 6648 kB
CRC 914ee97c
Kernel: arch/x86/boot/bzImage is ready (#1)
root@ceph-node-2:/usr/src/linux-3.9.10#
This operation can take a long time depending of your machine.
Copy your new kernel to the /boot folder (where is stored your current kernel):
root@ceph-node-2:/usr/src/linux-3.9.10# cp arch/$(uname -m)/boot/bzImage /boot/bzImage-3.10.9-xxxx-rbd-grs-ipv6-64
Optionally, store your new .config file next to your kernel in order to retrieve it in the future if your need id.
root@ceph-node-2:/usr/src/linux-3.9.10# cp .config /boot/config-3.10.9-xxxx-rbd-grs-ipv6-64
In this folder, you have the old and new kernel:
root@ceph-node-2:/usr/src/linux-3.9.10# ls /boot/
bzImage-3.10.9-xxxx-grs-ipv6-64 bzImage-3.10.9-xxxx-rbd-grs-ipv6-64 grub
System.map-3.10.9-xxxx-grs-ipv6-64
You must instruct in your grub.conf file, which kernel must be chosen at booting.
root@ceph-node-2:/usr/src/linux-3.9.10# cat /boot/grub/grub.cfg
[...]
### BEGIN /etc/grub.d/06_OVHkernel ###
menuentry "Debian GNU/Linux, OVH kernel 3.10.9-xxxx-grs-ipv6-64" {
insmod part_msdos
insmod ext2
set root='(hd0,msdos1)'
search --no-floppy --fs-uuid --set=root 4741ea6c-d8f0-4bea-aeba-429c3072fc9e
linux /boot/bzImage-3.10.9-xxxx-grs-ipv6-64
root=/dev/sda1 ro quiet
}
[...]
root@ceph-node-2:/usr/src/linux-3.9.10#
With the new grub2, only one command is required:
root@ceph-node-2:/usr/src/linux-3.9.10# update-grub
Generating grub.cfg ...
Found linux image: /boot/bzImage-3.10.9-xxxx-rbd-grs-ipv6-64
No volume groups found
done
root@ceph-node-2:/usr/src/linux-3.9.10#
Verify that the new kernel has replaced the old one in the grub entries before rebooting
root@ceph-node-2:/usr/src/linux-3.9.10# cat
/boot/grub/grub.cfg
[...]
### BEGIN /etc/grub.d/06_OVHkernel ###
menuentry "Debian GNU/Linux, OVH kernel 3.10.9-xxxx-rbd-grs-ipv6-64"
{
insmod part_msdos
insmod ext2
set root='(hd0,msdos1)'
search --no-floppy --fs-uuid --set=root 4741ea6c-d8f0-4bea-aeba
429c3072fc9e
linux /boot/bzImage-3.10.9-xxxx-rbd-grs-ipv6-64
root=/dev/sda1 ro
quiet
}
### END /etc/grub.d/06_OVHkernel ###
[...]
root@ceph-node-2:/usr/src/linux-3.9.10# reboot & exit;
Monitoring the Ceph cluster
Here are some command for monitoring the cluster status.
Check the health:
root@ceph-node-2:~# ceph health
HEALTH_OK
Get some detailed information about the cluster:
root@ceph-node-2:~# ceph status
cluster c964d663-6199-4b8e-831a-215cadd117c3
health HEALTH_OK
monmap e3: 3 mons at {ceph-node-1=94.23.225.212:6789/0,ceph-node
2=91.121.140.57:6789/0,ceph-node-3=91.121.152.50:6789/0}, election epoch
58, quorum 0,1,2 ceph-node-1,ceph-node-2,ceph-node-3
osdmap e110: 3 osds: 3 up, 3 in
pgmap v220: 192 pgs: 192 active+clean; 135 bytes data, 3182 MB used,
1542 GB / 1545 GB avail
mdsmap e1: 0/0/1 up
List OSDs tree:
root@ceph-node-2:~# ceph osd tree
# id weight type name up/down reweight
-1 1.51 root default
-2 0.81 host ceph-node-2
0 0.81 osd.0 up 1
-3 0.58 host ceph-node-1
1 0.58 osd.1 up 1
-4 0.12 host ceph-node-3
2 0.12 osd.2 up 1
Additional commands can be found here:
http://ceph.com/docs/master/rados/operations/monitoring/
Links
This document: http://switzernet.com/3/public/folder/130925-ceph-cluster/
Ceph, OCFS2, Dovecot: http://switzernet.com/3/public/130910-ceph-dovecot/
Ceph Home Page: http://ceph.com/
* * *

Copyright © 2013 by Switzernet